Beyond Basic Camping: Dive into the C-Fly Wedge with Texas Bushcraft Survival Tarp

Every outdoor enthusiast knows that an adaptable shelter system can be the difference between a comfortable night under the stars and a sleepless night braving the elements. Among the myriad of tarp configurations available, the C-Fly wedge has gained a reputation for its versatility and efficient use of space. Today, I'm going to guide you through the intricacies of setting up this reliable configuration using the robust Texas Bushcraft Survival Tarp.
Materials You'll Need:
1.Texas Bushcraft Survival Tarp (10ft x 10ft)
2. Firecraft Cord for the ridgeline
3. Stakes for securing the tarp to the ground
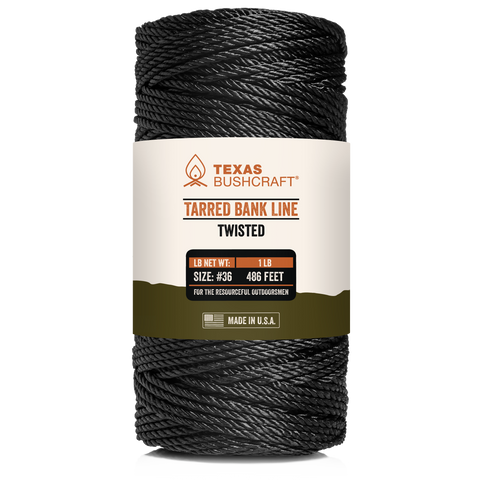
4. Texas Bushcraft Tarred Bank Line (specifically for the Prusik knots and guy lines)
5. Two sturdy trees spaced approximately 11ft-15ft apart
The Allure of the C-Fly (Wedge) Setup:
The C-Fly setup is not just a fancy name. It's a practical shelter design that has its roots in adaptability. On those warm, sunny days, the setup provides ample shade with generous headroom. But nature is unpredictable. When rainclouds loom, you can adjust the C-Fly to angle downwards, offering impeccable rain protection. And here's the kicker: unlike the wind shield setup which it closely resembles, part of the C-Fly tarp can be folded under to create a handy groundsheet. Yes, this reduces the interior space a tad, but the comfort of a dry ground is a fair trade-off.
Setting Up the C-Fly (Wedge) with the Texas Bushcraft Survival Tarp:

Step 1: Scout Location and Determine Distance Between Trees:
-Look for two sturdy trees, free from dead branches overhead. Ensure there are no signs of animal nests or trails that could indicate regular movement of wildlife through your chosen spot.
-Check the ground between the trees. Avoid low points or depressions where water might pool if it rains.
-Your trees should ideally be spaced around 11-12ft apart to provide room for tying the Firecraft Cord and allowing for some overhang of the tarp on each side.

Step 2: Ridgeline Setup:
-Use a Bowline or Clove Hitch knot to tie one end of the Firecraft Cord to the first tree at about head height.
-Stretch the cord to the other tree, ensuring it's taut, and tie it to the second tree using a similar knot. Your ridgeline is now in place.

Step 3: Lay Out the Tarp & Create Groundsheet:
-Spread your tarp on the ground beneath the ridgeline, with one edge under the ridgeline and the rest extending outwards.
-Fold a section of the tarp under to create the groundsheet. The size of this fold will dictate your headroom and interior space.

Step 4: Stake the Wind Shield & Integrate Pole Support:
-Place a suitable-length pole (e.g., a hiking stick or a dedicated tarp pole) vertically where you want the peak of your shelter. This pole provides central support.
-Drape the tarp over the pole, ensuring alignment for the desired headroom and structure.
-Securely stake down the corner nylon loops of the tarp side furthest from the ridgeline to form the wind shield. Add stakes to any middle loop(s) on this side for added tautness.

Step 5: Secure the Tarp to the Ridgeline:
Drape the edge of the tarp nearest the ridgeline over the Firecraft Cord, ensuring it's centered with equal portions on either side.
Using small lengths of Texas Bushcraft Tarred Bank Line, tie the nylon loops on this draped edge to the ridgeline using the Prusik knot. The tarred nature of the bank line will provide excellent grip, ensuring your tarp stays in place.

Step 6: Fold Over & Create Roof:
-Check roof size folded over the Firecraft Cord.
-Take the corner nylon loops of the draped section, tie them with Texas Bushcraft Tarred Bank Line for added strength and tension.
Depending on preference:
a.) For more headroom and shade: Extend the tied bank line from the corners, pull taut, and stake down, ensuring the tarp is flat.
b.) For better rain protection: Angle the tied bank line from the draped section downwards to create the “C-Fly Wedge” and stake it into the ground.

Step 7: Final Adjustments:
-Ensure all stakes are securely in the ground.
-Check the tarp is taut throughout to prevent water pooling.
-Adjust the ridgeline if necessary to maintain the desired roof height/angle.
Step 8: Additional Security:
-For added stability in adverse conditions, tie guy lines from the nylon loops to nearby anchors, be it trees, rocks, or additional stakes, using Texas Bushcraft Tarred Bank Line.
-When you venture into the wilderness with the Texas Bushcraft Survival Tarp, you're not just carrying a piece of equipment. You're armed with a refuge against the unpredictable elements—a testament to Texas Bushcraft's commitment to quality and durability. Constructed with top-tier 70D ripstop nylon and boasting an unmatched waterproof rating, it's not just a piece of gear. It's peace of mind.
Stay warm, dry, and sheltered in every outdoor adventure.

Who We Are
At Texas Bushcraft, we are a small family-owned business founded in 2018 in Austin, Texas. We were motivated to share our love for the outdoors and inspire others to enjoy nature without the need for big, fancy gadgetry. Our mission is to preserve traditional bushcraft skills and support our customers on their path to self-reliance. We offer simple, elegant outdoor gear and educational resources to help you prepare to thrive in the great outdoors. Thank you for choosing Texas Bushcraft as your guide.